
Routing
We use routing almost everyday. In the car, the GPS is our best friend. In public transportation we use the topological maps to find the quickest connections between point A and point B. Our mental maps allow us to get around traffic jam at known places.
For GPS especially, a lot of work is done upstream by engineers to make it possible to guide you through a city you do not know. Data has been collected, prepared and used in applications running on devices we call “GPS”, and which is almost mandatory to have in the car. With our today’s device, live traffic data are added into the algorithms to find the quickest (shortest? fastest?) route at any time of the day.
What about digging into this process and build our own routing application with (just) a small example?
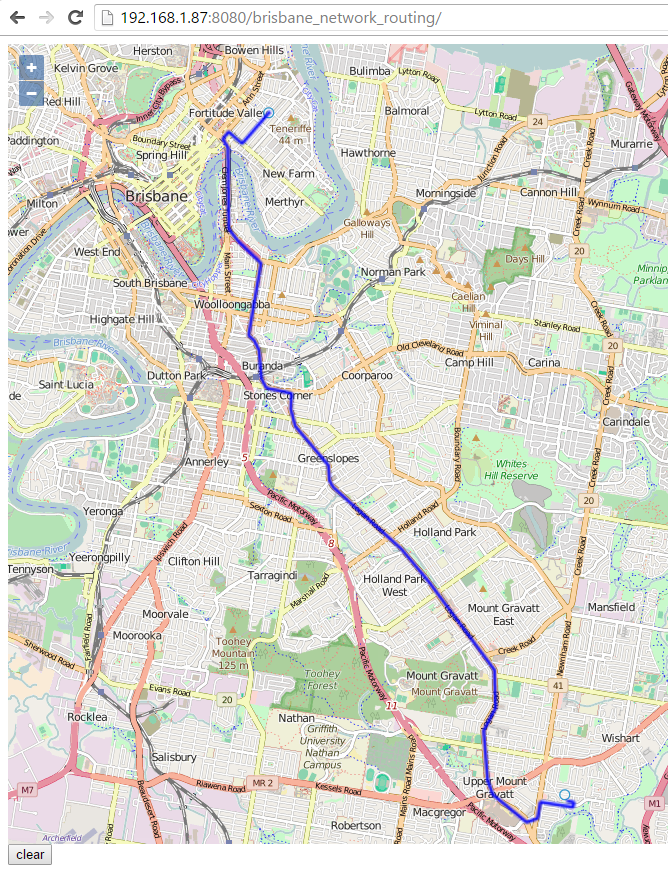
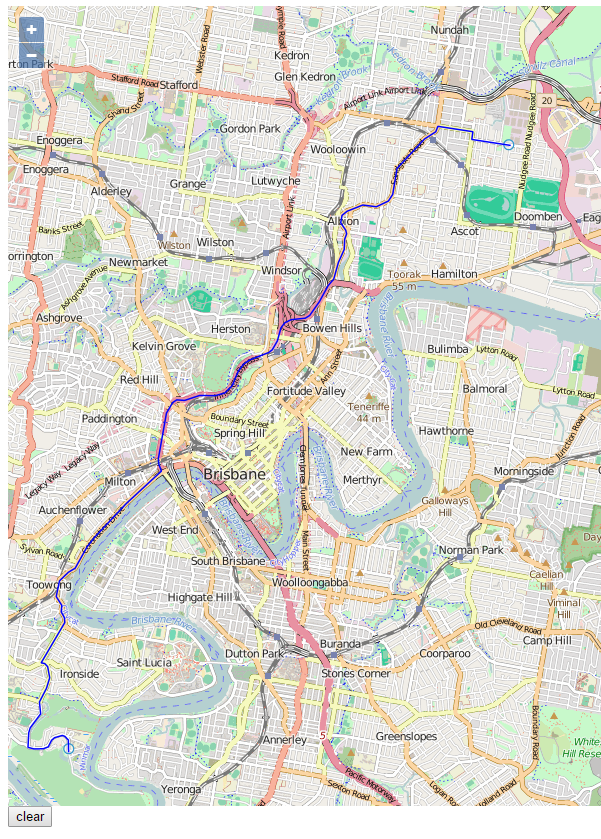
In this article, we focus on the development of a routing web application that gives the fastest route between two points the user chooses. Our city lab this time is Brisbane, QLD, and the web app we’re going to create looks like this (see hereunder). Unfortunately, I do not have yet a public server where I could share my apps, so you have to get fine with only screenshots, *sorry*.
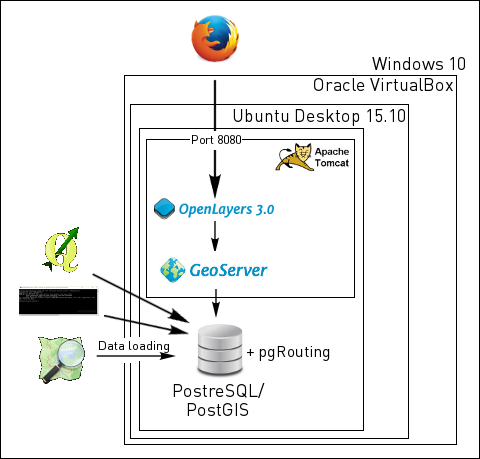
Using exclusively OpenSource data and products (except the host’s OS which is Windows 10 of course), the architecture we’ll built in this article looks like this.
The project can be split into following stages:
- Platform setup (installation of ubuntu, VirtualBox)
- Database installation and setup (PostgreSQL/PostGIS, pgRouting)
- Data collection (OpenStreetMap)
- Data loading (PostGIS)
- Data preparation (PostGIS)
- Development of the algorithm (PostGIS)
- Server setup (Tomcat and Geoserver)
- Web app development (OpenLayers)
Quick note: this article was inspired from the pgrouting workshop and can be followed by rookies as well as by a more advanced users.
Please find all the scripts I used in this article here: http://codes.themagiscian.com/osmrouting/
Platform setup
My main development machine is a Windows 10. I do however prefer delegate all the server jobs to a dedicated server. That’s why I make use of another server, ubuntu, I run in a VM.
Installation of ubuntu and Oracle VirtualBox
If you do already have a working ubuntu environment, you can skip this step.
My VL is a ubuntu Desktop. Everything is anyway done via command line despite the “Desktop”.
- Get ubuntu desktop for here.
- Choose the iso file as we will deploy it in VirtualBox
- Get Oracle VirtualBox from here.
Launch the Oracle VirtualBox and create a Ubuntu VM.
- New > and follow all the “next” steps
- Point to the downloaded iso file
- Right-click on the created VM > Settings > Storage and choose the iso file.
Congrats! Now start your server and follow the configuration steps of ubuntu.
NB: For convenience, it is better to set a static ip address to the server. The default dhcp configuration gives a random ip address each time you will connect. Follow the instructions here to set a static ip. The static ip I defined is 192.168.1.87.
Installation and setup of PostgreSQL/PostGIS/pgRouting
Installations
PostgreSQL is a free and Open Source database that can handle GIS data with its PostGIS cartridge. pgRouting is an extension of PostGIS allowing to do routing calculations. We need it too!
From the ubuntu machine, execute following commands to install the stack of database components we need:
sudo apt-get install postgresql-9.4
sudo apt-get install postgresql-9.4-postgis-2.1
sudo apt-get install postgresql-9.4-pgrouting
Install also the client tools on the host, which is Windows 10 here.
- Go on the PostGIS website and download the bundle
- The default installation folder is C:\Program Files (x86)\PostGIS_bundle\
You probably want to add the C:\Program Files (x86)\PostGIS_bundle\bin directory to the environment variable. That makes it later possible to access the tools directly in the command line.
Database setup
In Windows and in the command line, connect to the database instance via psql (the password was asked during the installation process).
psql -h192.168.1.87 -Upostgres
Create the role themagiscian. We limit this role to only create databases, tables, and login (no superuser).
CREATE ROLE themagiscian WITH PASSWORD 'xxx' CREATEDB NOCREATEROLE NOCREATEUSER INHERIT LOGIN NOREPLICATION;
Create the database.
CREATE TABLESPACE themagiscian_ts OWNER themagiscian LOCATION '/home/daniel/themagiscian/postgis';
CREATE DATABASE brisbane_network_routing WITH OWNER themagiscian;
The postgis and pgrouting extensions have to be activated. As only superusers can, you may have to log out and login with the postgres user to activate the extensions.
psql -h192.168.1.87 -Upostgres -dbrisbane_network_routing
CREATE EXTENSION postgis;
CREATE EXTENSION pgrouting;
Data collection
The data we use come from OpenStreetMap. As Brisbane is a big city with a wide urban spread, the amount of data we need is quite huge for our routing. Using the OpenStreetMap website is not suitable for this. overpass-turbo.eu is more in our scope as it’s better for the download of larger datasets. Please have a look at this article to know which tool to use for download depending on the size of the exepected data.
- Go to http://overpass-turbo.eu/
- Paste in following query to get all the streets suitable for a car.
- Ways for horses, bicycles, pedestrians can be the subject of another article. The language used here is a specifically crafted query language and the highway keys used were taken from here.
(
 way
 ["highway"="bridleway"]
 (-27.718795,152.613120,-27.182610,153.518998);
 way
 ["highway"="living_street"]
 (-27.718795,152.613120,-27.182610,153.518998);
 way
 ["highway"="motorway"]
 (-27.718795,152.613120,-27.182610,153.518998);
 way
 ["highway"="motorway_link"]
 (-27.718795,152.613120,-27.182610,153.518998);
 way
 ["highway"="primary"]
 (-27.718795,152.613120,-27.182610,153.518998);
 way
 ["highway"="primary_link"]
 (-27.718795,152.613120,-27.182610,153.518998);
 way
 ["highway"="residential"]
 (-27.718795,152.613120,-27.182610,153.518998);
 way
 ["highway"="road"]
 (-27.718795,152.613120,-27.182610,153.518998);
 way
 ["highway"="secondary"]
 (-27.718795,152.613120,-27.182610,153.518998);
 way
 ["highway"="secondary_link"]
 (-27.718795,152.613120,-27.182610,153.518998);
 way
 ["highway"="tertiary"]
 (-27.718795,152.613120,-27.182610,153.518998);
 way
 ["highway"="tertiary_link"]
 (-27.718795,152.613120,-27.182610,153.518998);
 way
 ["highway"="trunk"]
 (-27.718795,152.613120,-27.182610,153.518998);
 way
 ["highway"="trunk_link"]
 (-27.718795,152.613120,-27.182610,153.518998);
);
out body;
>;
out skel qt;
- Click on Run
- Click on Export and choose the raw osm format
Data loading
The way I decided to load the data was via the shp2pgsql tool. Note that there are many other ways to load osm data into PostGIS (osm2pgsql for instance). The data has however to be converted from the raw osm format, to shapefile. I used QGIS for this task.
- Import the data into QGIS
- When asked, choose to display only the multilinestring features
- Right-click the data > Save as
- Specify the output format as Shapefile
I call the file BRISBANE_ROADS_OSM.shp and I reference it in the shp2pgsql script hereunder. Have a look at this page to get the meaning of all the parameters.
shp2pgsql -s4326 -d -S -ggeom -I "[...]\ROUTING_BRISBANE\Data\BRISBANE_ROADS_OSM.shp" public.network2clean | psql -Uthemagiscian -h192.168.1.87 -dbrisbane_network_routing
NB: The -S parameters is very important as it generates simple geometries. We absolutely need that for our routing algorithm.
NB2: The name of the imported table is network2clean. Following steps will go through a cleaning process and finally we will give the proper name “network” to the table.
Data preparation
The important data are still “raw”. That means, they contain all the attributes and attribute values coming from OpenStreetMap contributors. There is about 130 columns in the data and we have to clean it a little bit up.
Column merge
First, we merge different columns referring to the same attribute.
-- Merge columns 'maxheight' and 'maxheight_'
UPDATE network2clean set maxheight=maxheight_ WHERE maxheight_ is not null;

-- Merge the speed columns: 'maxspeed', 'maxspeed_b'
UPDATE network2clean SET maxspeed=maxspeed_b WHERE maxspeed_b IS NOT NULL;
UPDATE network2clean SET maxspeed=40 WHERE maxspeed_c IS NOT NULL;

-- Merge Bicycle columns: 'cycleway', 'cycleway_1', 'cycleway_l'
UPDATE network2clean set cycleway=cycleway_1 WHERE cycleway IS NULL AND cycleway_1 IS NOT NULL;
UPDATE network2clean set cycleway=cycleway_l WHERE cycleway IS NULL AND cycleway_l IS NOT NULL;
Drop unnecessary columns
There are lots of columns we do not need in our routing application for cars. For example, the columns about railways, the name of the contributor, bus_lanes, etc. We simply drop these columns up.
ALTER TABLE network2clean drop column "@id", drop column abutters, DROP COLUMN addr_city, DROP COLUMN addr_house, DROP COLUMN addr_postc, DROP COLUMN addr_stree, DROP COLUMN addr_subur, DROP COLUMN admin_leve, DROP COLUMN alt_name, DROP COLUMN amenity, DROP COLUMN area, DROP COLUMN attributio, DROP COLUMN bicycle, DROP COLUMN bridge_n_1, DROP COLUMN bridge_nam, DROP COLUMN comment, DROP COLUMN completion, DROP COLUMN constructi, DROP COLUMN continues, DROP COLUMN created_by, DROP COLUMN cutting, DROP COLUMN cycleway_1 , DROP COLUMN cycleway_l , DROP COLUMN cycleway_r, DROP COLUMN destinat_1, DROP COLUMN destinatio, DROP COLUMN embankment, DROP COLUMN fixme, DROP COLUMN flood_pron, DROP COLUMN ford, DROP COLUMN goods, DROP COLUMN height, DROP COLUMN hgv, DROP COLUMN history, DROP COLUMN incline, DROP COLUMN int_name, DROP COLUMN is_in, DROP COLUMN landuse, DROP COLUMN lanes_back, DROP COLUMN lanes_bus_, DROP COLUMN lanes_forw, DROP COLUMN layer, DROP COLUMN lcn, DROP COLUMN leisure, DROP COLUMN lit, DROP COLUMN man_made, DROP COLUMN maxheight_, DROP COLUMN maxspeed_b, DROP COLUMN maxspeed_c, DROP COLUMN maxspeed_f, DROP COLUMN maxspeed_r, DROP COLUMN maxspeed_s, DROP COLUMN maxweight, DROP COLUMN motor_vehi, DROP COLUMN motorcar, DROP COLUMN motorcycle, DROP COLUMN motorroad, DROP COLUMN mtb, DROP COLUMN mtb_name, DROP COLUMN mtb_scale, DROP COLUMN name_ru, DROP COLUMN name_sourc, DROP COLUMN "natural", DROP COLUMN noexit, DROP COLUMN note, DROP COLUMN odbl, DROP COLUMN operator, DROP COLUMN psv, DROP COLUMN railway, DROP COLUMN network, DROP COLUMN rcn, DROP COLUMN rcn_ref, DROP COLUMN restrict_1, DROP COLUMN restrictio, DROP COLUMN roundabout, DROP COLUMN route, DROP COLUMN sac_scale, DROP COLUMN segregated, DROP COLUMN service, DROP COLUMN sidewalk, DROP COLUMN smoothness, DROP COLUMN source, DROP COLUMN source_acc, DROP COLUMN source_bri, DROP COLUMN source_cyc, DROP COLUMN source_geo, DROP COLUMN source_lcn, DROP COLUMN source_m_1, DROP COLUMN source_max, DROP COLUMN source_nam, DROP COLUMN source_one, DROP COLUMN source_r_1, DROP COLUMN source_ref, DROP COLUMN source_sur, DROP COLUMN todo, DROP COLUMN toll, DROP COLUMN tracktype, DROP COLUMN traffic_ca, DROP COLUMN trail_visi, DROP COLUMN turn_lan_1, DROP COLUMN turn_lan_2, DROP COLUMN turn_lanes, DROP COLUMN type, DROP COLUMN undefined, DROP COLUMN unsigned, DROP COLUMN vehicle, DROP COLUMN website, DROP COLUMN width;
Split lines at intersections
Here comes the tough part. The lines we are handling are not well split although we need them to be so. In other words, start points and end point of lines do not currently coincide. Our algorithm needs that to perform routing. We could simply execute a ‘split at intersection’ command but we have to take care not to split, for example, tunnels, bridges, or motorways.
We proceed as following:
- we create points at intersections where they apply,
- we define a new function making it possible to split lines at points,
- we execute this splitting.
Create points at intersections
The tables that will welcome the nodes has first to be created.
-- CREATE NODES TABLE
DROP TABLE IF EXISTS nodes;
CREATE TABLE nodes (geom GEOMETRY);
SELECT UpdateGeometrySRID('nodes', 'geom', 4326) from nodes;
Start and end points of each single line is loaded into this table.
-- INSERT START-, END- and INTERSECTION POINTS
 INSERT INTO nodes SELECT ST_StartPoint(geom) from network2clean;
 INSERT INTO nodes SELECT ST_EndPoint(geom) from network2clean;
 INSERT INTO nodes
Lines have to be split except if they are highways, identified by “motorway”, highway links, bridges or tunnels.
SELECT (ST_INTERSECTION(ne.geom, ne2.geom))
 FROM
 (SELECT id, geom FROM network2clean
 WHERE highway NOT IN ('motorway', 'motorway_link')
 AND bridge IS NULL
 AND tunnel IS NULL) ne,
 (SELECT id, geom FROM network2clean
 WHERE highway NOT IN ('motorway', 'motorway_link')
 AND bridge IS NULL
 AND (tunnel IS NULL OR tunnel = 'no')) ne2
 WHERE ST_INTERSECTS(ne.geom, ne2.geom)
 AND ne.id < ne2.id;
The intersection between lines can be a line, a multiline, a point or a multipoint. We’re only interested in points and multipoints we have to explode to only keep the individuals.
-- ONLY KEEP VALID SINGLE POINTS
 INSERT INTO nodes SELECT (ST_DUMP(geom)).geom FROM nodes WHERE ST_GEOMETRYTYPE(geom) = 'ST_MultiPoint';
Delete all the geometries which are not points.
-- CLEAN TABLE
 DELETE FROM nodes WHERE ST_GEOMETRYTYPE(geom) != 'ST_Point';
 DELETE FROM nodes WHERE geom IS NULL;
Create an index and a unique id.
-- CREATE INDEX
 DROP INDEX IF EXISTS nodes_gidx;
 CREATE INDEX nodes_gidx ON nodes USING GIST (geom);
-- ADD UNIQUE NODE IDENTIFIER
 ALTER TABLE nodes ADD COLUMN id serial NOT NULL;
We make sure there are no duplicated point.
-- DELETE DUPLICATES
 DELETE FROM nodes WHERE nodes.id IN (SELECT n2.id from nodes n1, nodes n2 where ST_EQUALS(n1.geom,n2.geom) and n1.id < n2.id);
Create the ST_MultiSplit function
There is already the ST_split function available in PostGIS. It however cannot handle multisplit. In other words, using ST_split would result in a lot of duplicated geometries. The function we define here should only keep the split lines. I found on the web such a function and I adapted it.
CREATE OR REPLACE FUNCTION ST_MultiSplit(geom Geometry, blades Geometry) RETURNS Geometry AS $$
BEGIN
 FOR i IN 1..ST_NumGeometries(blades)
 LOOP
 geom = ST_Split(geom, ST_GeometryN(blades, i));
 END LOOP;
 RETURN geom;
END;
$$ LANGUAGE plpgsql;
Create a new network
The last thing to do in this network creation is to … create the network! Here we make use of the newly created ST_MultiSplit function just here above.
Each line is split by the intersection points. We almost double the total amount of rows in the table during this process.
NB: The name of the table is changed here (from network2clean to network).
DROP TABLE IF EXISTS network;
CREATE TABLE network AS
SELECT * FROM (
 SELECT ne.gid, ne.id, ne.highway, ne.maxspeed, ne.name, ne.oneway, ne.surface, ne.ref, ne.lanes, ne.bridge, ne.junction, ne.cycleway, ne.access, ne.tunnel, ne.foot, ne.level, ne.maxheight, ne.horse, (ST_Dump(ST_MultiSplit(ne.geom, (
 SELECT ST_Union(no.geom) FROM nodes no WHERE ST_intersects(no.geom,ne.geom)
)))).geom geom FROM network2clean ne) a;
DROP TABLE network2clean;
Set speedlimits
Not all streets and roads have a value for the speedlimit attribute. We do however need all rows to be filled for the routing purpose as we have to calculate the time it takes to cross every single street.
For doing things easier, we first define a new function which output is the speedlimit for the highway as input. For example, in Brisbane, the speedlimit on motorways is 110 kmh, in residential areas it is often 30 (notice we often underestimate values to highend the total amount of minutes per itinirary – this will give results closer to reality as we have to take into account delays such as crossroad, traffic lights, traffic jams, etc.)
CREATE OR REPLACE FUNCTION osm_set_speedlimit(varchar) RETURNS smallint AS $$
DECLARE
 highway ALIAS FOR $1;
BEGIN
 IF highway = 'access' THEN
 RETURN 0;
 ELSIF highway = 'bridleway' THEN
 RETURN 10;
 ELSIF highway = 'construction' THEN
 RETURN 0;
 ELSIF highway = 'conveyor' THEN
 RETURN 0;
 ELSIF highway = 'cycleway' THEN
 RETURN 0;
 ELSIF highway = 'footway' THEN
 RETURN 0;
 ELSIF highway = 'living_street' THEN
 RETURN 30;
 ELSIF highway = 'motorway' THEN
 RETURN 110;
 ELSIF highway = 'motorway_link' THEN
 RETURN 90;
 ELSIF highway = 'none' THEN
 RETURN 0;
 ELSIF highway = 'path' THEN
 RETURN 0;
 ELSIF highway = 'pedestrian' THEN
 RETURN 0;
 ELSIF highway = 'primary' THEN
 RETURN 90;
 ELSIF highway = 'primary_link' THEN
 RETURN 70;
 ELSIF highway = 'proposed' THEN
 RETURN 0;
 ELSIF highway = 'raceway' THEN
 RETURN 0;
 ELSIF highway = 'residential' THEN
 RETURN 30;
 ELSIF highway = 'road' THEN
 RETURN 60;
 ELSIF highway = 'secondary' THEN
 RETURN 50;
 ELSIF highway = 'secondary_link' THEN
 RETURN 50;
 ELSIF highway = 'service' THEN
 RETURN 0;
 ELSIF highway = 'steps' THEN
 RETURN 0;
 ELSIF highway = 'tertiary' THEN
 RETURN 50;
 ELSIF highway = 'tertiary_link' THEN
 RETURN 50;
 ELSIF highway = 'track' THEN
 RETURN 0;
 ELSIF highway = 'trunk' THEN
 RETURN 30;
 ELSIF highway = 'trunk_link' THEN
 RETURN 30;
 ELSIF highway = 'unclassified' THEN
 RETURN 0;
 ELSIF highway = 'unsurfaced' THEN
 RETURN 0;
 END IF;
 RETURN NULL;
END;
$$ LANGUAGE plpgsql;
Data completion
We continue our network cleaning process here.
First of all, we rename the maxspeed column to speedlimit
-- RENAME SPEEDLIMIT
ALTER TABLE network RENAME maxspeed TO speedlimit;
The speedlimit colum is populated here.
-- UPDATE SPEEDLIMIT
UPDATE network SET speedlimit = 50 WHERE speedlimit LIKE '50%';
UPDATE network SET speedlimit = osm_set_speedlimit(highway) WHERE speedlimit IS NULL;
ALTER TABLE network ALTER COLUMN speedlimit TYPE smallint USING speedlimit::smallint;
With maxspeed and the length of each segment, we extract the time it takes to travel each line.
-- CALCULATE THE TIME IN MINUTES IT TAKES TO CROSS THE SEGMENT
ALTER TABLE network ADD COLUMN time_min double precision;
UPDATE network SET time_min = (ST_Length(geom::geography) / (speedlimit * 1000 / 60)) where speedlimit <> 0 AND speedlimit IS NOT NULL;
UPDATE network SET time_min = 99999 where time_min IS NULL;
VERY IMPORTANT: we need to take into account oneway streets! Some of the streets have their ‘oneway’ fields filled with a value, but this is not the case for all the rows. Basically, we fill the column ‘oneway’ with a ‘n’ for no where the field is not already set to yes. Additionnaly, motorway, motorway links and roundabouts are also set to oneway. This is essential for routing.
-- UPDATE ONEWAY FIELD
UPDATE network SET oneway = 'y' where oneway='yes';
UPDATE network SET oneway = 'y' where oneway='-1';
UPDATE network SET oneway = 'n' where oneway='no';
UPDATE network SET oneway = 'y' where highway in ('motorway', 'motorway_link', 'trunk', 'trunk_link') and oneway is null;
UPDATE network SET oneway = 'n' where oneway IS NULL;
UPDATE network SET oneway = 'y' where junction = 'roundabout';
ALTER TABLE network ALTER COLUMN oneway TYPE varchar(1) USING oneway::varchar(1);
Sometimes, we need to know what is the maximum height allowed on a street. We noticed some discrepancy with the data. We fix that here.
-- UPDATE MAXHEIGHT DATA
UPDATE network SET maxheight = 2.8 WHERE maxheight = '2.8m';
UPDATE network SET maxheight = NULL WHERE maxheight in ('??', 'FIXME', 'fixme');
ALTER TABLE network ALTER COLUMN maxheight TYPE FLOAT USING maxheight::double precision;
All lanes are put to 1 when it is not indicated the opposite.
-- UPDATE LANES FIELD
UPDATE network SET lanes = 1 WHERE lanes IS NULL;
ALTER TABLE network ALTER COLUMN lanes TYPE smallint USING lanes::smallint;
We set the attribut “bridge” to “No” when nothing is already specified.
-- UPDATE BRIDGE FIELD
UPDATE network SET bridge = 'No' WHERE bridge IS NULL;
ALTER TABLE network ALTER COLUMN bridge TYPE varchar(10) USING bridge::varchar(10);
So we do as well for the horse field (even if we do not need this field in this article as we’re dealing with car routing).
-- UPDATE HORSE FIELD
UPDATE network SET horse = 'yes' WHERE horse IS NULL;
ALTER TABLE network ALTER COLUMN horse TYPE varchar(10) USING horse::varchar(10);
Some comectics.
-- CHANGE COLUMN level FROM VARCHAR TO SMALLINT
ALTER TABLE network ALTER COLUMN level TYPE smallint USING lanes::smallint;
We create a new unique id as the previously used id, gid, was duplicated during the MultiSplit process.
-- CREATE NEW ID
ALTER TABLE network RENAME COLUMN id TO osmid;
ALTER TABLE network ADD COLUMN id serial NOT NULL;
As we do allow routing along streets in both directions, we have to define a reverse cost. Sometimes, the travel time is different in both directions. For one-way streets, we put the reverse cost to 99999 minutes to be sure our algorithm does never lead the car there.
-- Reverse cost
ALTER TABLE network ADD COLUMN reverse_time_min double precision;
UPDATE network SET reverse_time_min = time_min where oneway='n';
UPDATE network SET reverse_time_min = 99999 where oneway='y';
Create the topology
The topology creates a network of interconnected lines by points. For each line, we must specify the start and the end point, which are the vertices. The output table can then be ‘routed’ in the algorithm.
ALTER TABLE network ADD COLUMN "source" integer;
ALTER TABLE network ADD COLUMN "target" integer;
ALTER TABLE network ADD CONSTRAINT network_pk PRIMARY KEY (id);
CREATE INDEX network_idx ON network(id);
SELECT pgr_createTopology('network', 0.0000001, 'geom', 'id');
ALTER TABLE network_vertices_pgr RENAME the_geom to geom;
Development of the algorithm
The algorithm we use is naturally Dijkstra. This algorithm is available as we did import the pgRouting capabilities.
This function is put inside a wrapper for the function to be easier to use. The procedure is described here, but the function is adapted to match our needs.
The function takes in input the network table and the coordinates of the start and end point. The function then chooses the nearest vertice it finds and calculate the shortest path with the Dijkstra algorithm. Execute this script in pgsql.
--
 --DROP FUNCTION pgr_fromAtoB(varchar, double precision, double precision,
 -- double precision, double precision);

CREATE OR REPLACE FUNCTION pgr_fromAtoB(
 IN tbl varchar,
 IN x1 double precision,
 IN y1 double precision,
 IN x2 double precision,
 IN y2 double precision,
 OUT seq integer,
 OUT id integer,
 OUT name text,
 OUT heading double precision,
 OUT cost double precision,
 OUT geom geometry
 )
 RETURNS SETOF record AS
 $BODY$
 DECLARE
 sql text;
 rec record;
 source integer;
 target integer;
 point integer;

BEGIN
 -- Find nearest node
 EXECUTE 'SELECT id::integer FROM network_vertices_pgr
 ORDER BY geom <-> ST_GeometryFromText(''POINT('
 || x1 || ' ' || y1 || ')'',4326) LIMIT 1' INTO rec;
 source := rec.id;

EXECUTE 'SELECT id::integer FROM network_vertices_pgr
 ORDER BY geom <-> ST_GeometryFromText(''POINT('
 || x2 || ' ' || y2 || ')'',4326) LIMIT 1' INTO rec;
 target := rec.id;

-- Shortest path query (TODO: limit extent by BBOX)
 seq := 0;
 sql := 'SELECT id, geom, name, cost, reverse_time_min, source, target,
 ST_Reverse(geom) AS flip_geom FROM ' ||
 'pgr_dijkstra(''SELECT id, source::int, target::int, '
 || 'time_min::float AS cost, reverse_time_min::float AS reverse_cost FROM '
 || quote_ident(tbl) || ''', '
 || source || ', ' || target
 || ' , false, true), '
 || quote_ident(tbl) || ' WHERE id2 = id ORDER BY seq';

-- Remember start point
 point := source;

FOR rec IN EXECUTE sql
 LOOP
 -- Flip geometry (if required)
 IF ( point != rec.source ) THEN
 rec.geom := rec.flip_geom;
 point := rec.source;
 ELSE
 point := rec.target;
 END IF;

-- Calculate heading (simplified)
 EXECUTE 'SELECT degrees( ST_Azimuth(
 ST_StartPoint(''' || rec.geom::text || '''),
 ST_EndPoint(''' || rec.geom::text || ''') ) )'
 INTO heading;

-- Return record
 seq := seq + 1;
 id := rec.id;
 name := rec.name;
 cost := rec.cost;
 geom := rec.geom;
 RETURN NEXT;
 END LOOP;
 RETURN;
 END;
 $BODY$
 LANGUAGE 'plpgsql' VOLATILE STRICT;
Test the function
The function can be tested with following command.
-- TEST pgr_fromAtoB
DROP TABLE TESTROUTING;
CREATE TABLE TESTROUTING AS SELECT * FROM pgr_fromAtoB('network',152.96030,-27.50008,153.03479,-27.44876);
Please see the result by adding this layer TESTROUTING into QGIS.
Server setup
The server side is composed of an application server, Tomcat 8 here, and Geoserver for serving the network data.
- Here to install Tomcat.
sudo apt-get install tomcat8
- Geoserver can be downloaded as a war and deployed in Tomcat.
- Go on this website to download the war file
http://geoserver.org/release/stable/
- Just drop this war file into Tomcat’s webapps folder /var/lib/tomcat8/webapps.
- Start the server
sudo service tomcat8 start
- You probably have to run following query to make it possible for external clients to access the port 8080, Tomcat’s default port number.
sudo /sbin/iptables -A INPUT -m state --state NEW -m tcp -p tcp --dport 8080 -j ACCEPT
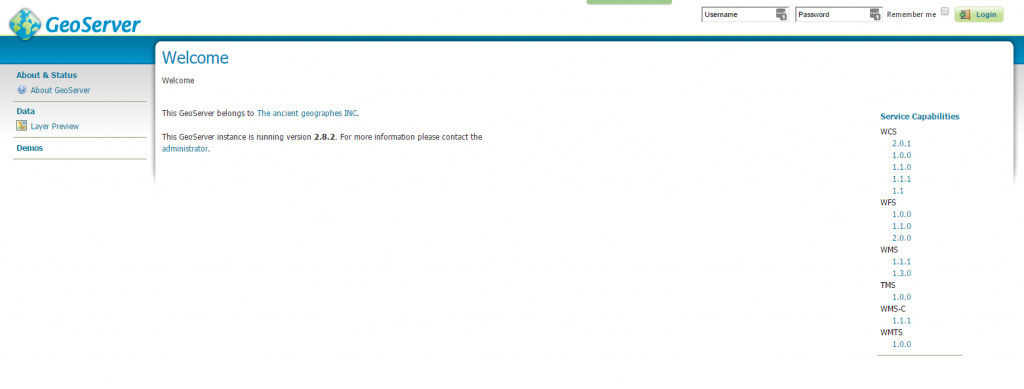
On the external client machine, try this url to see if Geoserver is well deployed http://192.168.1.87:8080/geoserver
- Log in with the default credentials admin/geoserver.
- Note: change your password immediately! (Go to Passwords > Change Password)
- Create a new user
- I created the user themagiscian: Go to User, Groups, Role > Add new user
- Log out from admin and log in as themagiscian
- Create Workspace
- I called it Brisbane_network_routing
- Do not forget to check the WMS checkbox on the right
- Create Store
- Choose the Brisbane_network_routing workspace
- Data Source Name: pgis
- host: 192.168.1.87
- Port: 5432
- Database: brisbane_network_routing
- Schema: public
- User: themagiscian
- Finally, create the Layer
- Name: network
- Native SRS: EPSG:4326
- Declared: EPSG:3857 (The data are in 4326 but OpenLayers works in 3857)
- In the Bounding Box space, click on Compute from data and Compute from native bounds
- Click on the Edit SQL View and paste in following query
SELECT ST_MakeLine(route.geom) FROM (SELECT geom FROM pgr_fromAtoB('network', %x1%, %y1%, %x2%, %y2%) ORDER BY seq) AS route
- Be sure all the other parameters are set like this.
-
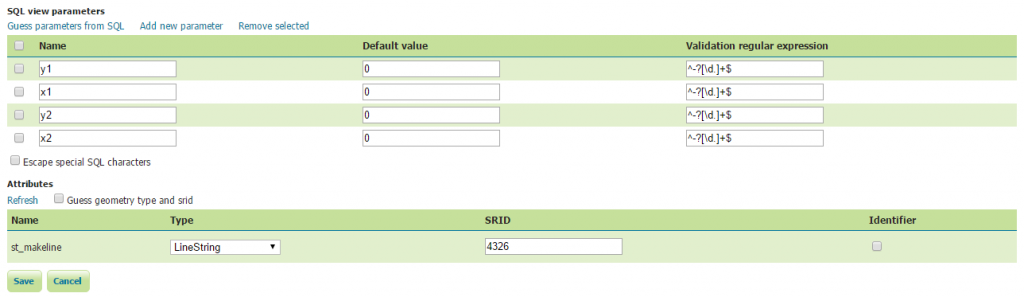
Geoserver parameters
Congratulations! The routing server is now ready to welcome the requests coming from our OpenLayers client!
Just test if the wms server is running by going on following website:
http://192.168.1.87:8080/geoserver/Brisbane_network_routing/wms?request=GetCapabilities&version=1.3.0&service=WMS
You should get the result of the GetCapabilities request.
Web app development
This is the final part! Almost done! 🙂
The website makes it possible for the user to pick a starting and an end point. The application calculates then the fastest path between these two points.
As we’re (trying to) doing things properly, we will create three files: html, js, and css.
- Create a new folder in geoserver’s webapps folder and call it “brisbane_network_routing”.
- The following three files (html, js and css) have to be deployed there.
index.html
This is the skeleton of our website. It is composed of a map and a button to clear the shortest path that was just drawn. We import the styles ol.css, the OpenLayers library and the bnr.js file, which takes care of the actions done when using the web app.
<!DOCTYPE html>
<html>
 <head>
     <title>Brisbane Network Routing</title>
     <meta charset="utf-8">
     <link href="css/ol.css" rel="stylesheet">
     <style>
         #map {
         width: 100%;
         height: 800px;
         }
     </style>
 </head>
 <body>
     <div id="map"></div>
     <button id="clear">clear</button>
     <script src="https://cdnjs.cloudflare.com/ajax/libs/ol3/3.15.1/ol.js"></script>
     <script src="js/bnr.js"></script>
 </body>
</html>
bnr.js
Bnr stands for Brisbane Network Routing.
The map object is responsible for the map. Its default location is in Brisbane’s CBD 17035589.221, -3179098.060 . We add controls such as zoom in/zoom out.
The second part of the file takes care of the user’s actions. It creates a point feature where the user clicks. The most important part is probably the call to the server for the calculation of the itinirery (http://192.168.1.87:8080/geoserver/Brisbane_network_routing/wms).
The last part of the file is about the cleaning of the map. Once an itinirery is calculated, it can be cleaned for another calculation.
var map = new ol.Map({
    target: 'map',
    layers: [
        new ol.layer.Tile({
            source: new ol.source.OSM()})
    ],
    view: new ol.View({
        center: [17035589.221, -3179098.060],
        zoom: 15
    }),
    controls: ol.control.defaults({
        attributionOptions: {
            collapsible: false
    }})});
var params = {
    LAYERS: 'network',
    FORMAT: 'image/png'
};

// The "start" and "destination" features.
var startPoint = new ol.Feature();
var destPoint = new ol.Feature();

// The vector layer used to display the "start" and "destination" features.
var vectorLayer = new ol.layer.Vector({
    source: new ol.source.Vector({
        features: [startPoint, destPoint]
})});
map.addLayer(vectorLayer);

// A transform function to convert coordinates from EPSG:3857
// to EPSG:4326.
var transform = ol.proj.getTransform('EPSG:3857', 'EPSG:4326');

// Register a map click listener.
map.on('click', function(event) {
    if (startPoint.getGeometry() == null) {
        // First click.
        startPoint.setGeometry(new ol.geom.Point(event.coordinate));
    } else if (destPoint.getGeometry() == null) {
        // Second click.
        destPoint.setGeometry(new ol.geom.Point(event.coordinate));
        // Transform the coordinates from the map projection (EPSG:3857)
        // to the server projection (EPSG:4326).
 var startCoord = transform(startPoint.getGeometry().getCoordinates());
        var destCoord = transform(destPoint.getGeometry().getCoordinates());
        var viewparams = [
            'x1:' + startCoord[0], 'y1:' + startCoord[1],
            'x2:' + destCoord[0], 'y2:' + destCoord[1]
        ];
        params.viewparams = viewparams.join(';');
        result = new ol.layer.Image({
            source: new ol.source.ImageWMS({
                url: 'http://192.168.1.87:8080/geoserver/Brisbane_network_routing/wms',
                params: params
            })
        });
        map.addLayer(result);
 }});

var clearButton = document.getElementById('clear');
clearButton.addEventListener('click', function(event) {
    // Reset the "start" and "destination" features.
    startPoint.setGeometry(null);
    destPoint.setGeometry(null);
    // Remove the result layer.
    map.removeLayer(result);
});
css
The ol.css file comes right from OpenLayers. Nothing changed in this file
Demo
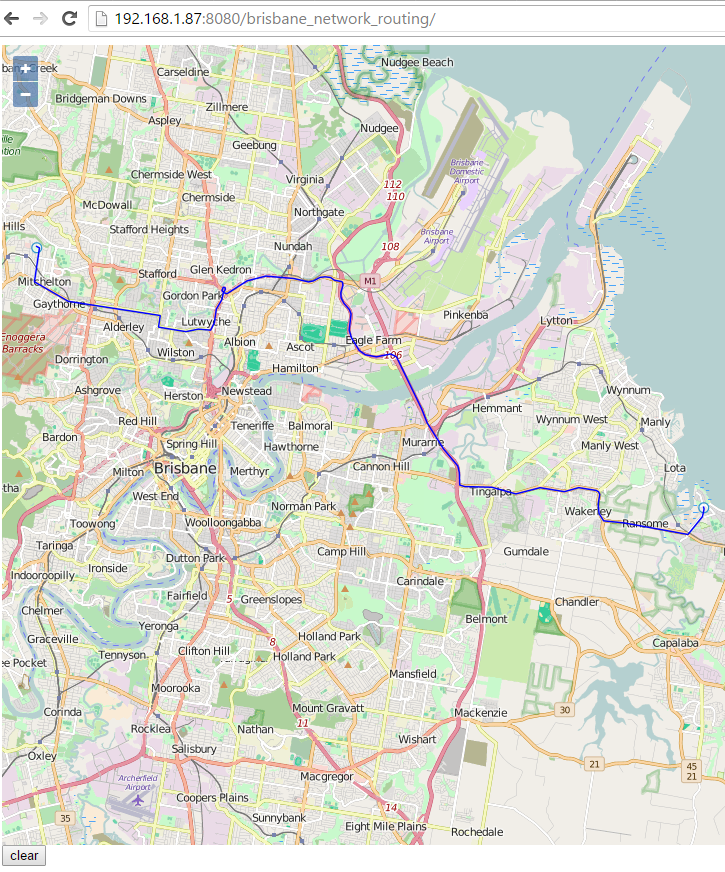
On the host machine, open a browser and navigate to your VM, that is http://192.168.1.87:8080/brisbane_network_routing
Click two points on the map and ENJOY 🙂
As stated before, I do not have a public server where I could share the whole application.
Cheers,
Daniel
Why didn’t you use osm2pgrouting to import the OpenStreetMap data?
It does all the way splitting and a bunch of other tweaks to the data, so all the manual import using SHP files is not necessary.
Hi Daniel,
Thank you for you comment=
Using osm2pgrouting is much more easier and faster, that’s right, and I consider posting an updated article using this tool.
The first philosophy of my article was to dig deep into data processing and to show in detail all the mechanics and aspects you should take into consideration when preparing data for a routing purpose. osm2pgrouting does all this stuff quite “naturally”, for not saying “transparently”. For my pedagogic oriented technical blog, I thought the first option was more suitable. But let’s be productive and use osm2pgrouting! New article is coming!
Thank you,
Best Regards,
Daniel
Thank you!
I understand that osm2pgrouting is sort of a “blackbox”. However, the reason why I wanted to mention it, is, that – as you wrote in your post – OSM does not provide the correct network topology when you import data with osm2pgsql for example. You need to create nodes at intersections sometimes, but not every crossing linestring is an intersection.
osm2pgrouting should help to have a correct network topology. I’m pretty sure there are cases, that osm2pgrouting doesn’t handle yet either. Nevertheless the result is probably better than trying it for the first time manually.